2017-03-24 08:15
聯(lián)想拯救者R9000P 2021筆記本采用了amd ryzen 7 5000系...
如果有使用華擎H77M-ITX主板的用戶(hù)想要為電腦重新...
最近有位win10系統(tǒng)用戶(hù)在使用電腦更新了新版本后...
華碩筆記本實(shí)現(xiàn)u盤(pán)安裝win10系統(tǒng)視頻教程
修復(fù)磁盤(pán)壞道視頻教程
u深度一鍵u盤(pán)裝ghost win7系統(tǒng)視頻教程
u深度系統(tǒng)密碼清除工具視頻教程
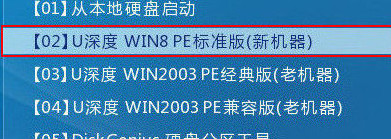
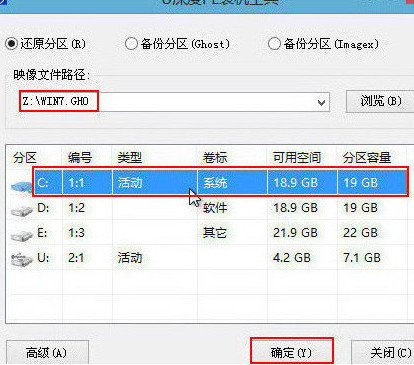
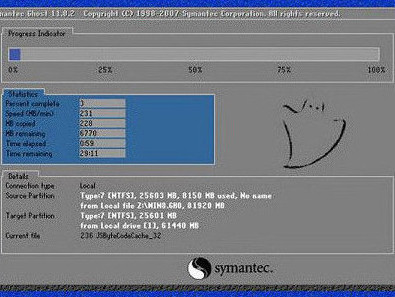
u深度一鍵u盤(pán)裝ghost win8系統(tǒng)視頻教程


 聯(lián)想拯救者Y7000P 2021筆記本安裝win11系統(tǒng)教程
 華擎Z77 Pro4-M主板如何通過(guò)bios設(shè)置u盤(pán)啟動(dòng)
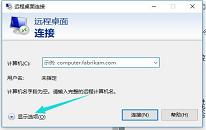 win10系統(tǒng)使用遠(yuǎn)程桌面操作教程分享
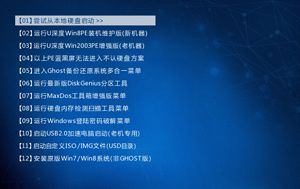


 電腦一鍵u盤(pán)啟動(dòng)快捷鍵使用教程
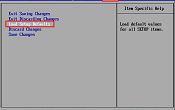 詳解如何還原bios出廠設(shè)置
 Bios恢復(fù)出廠設(shè)置操作方法
 華碩X403MA2940筆記本實(shí)現(xiàn)一鍵u盤(pán)啟動(dòng)方法
 如何將電腦硬盤(pán)模式修改為ahci模式
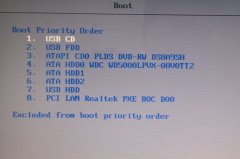
 如何通過(guò)bios設(shè)置u盤(pán)啟動(dòng)項(xiàng)實(shí)現(xiàn)U盤(pán)啟動(dòng)
 win8改win7安裝前怎么設(shè)置bios